Good property marketing in the cutthroat realm of real estate depends mostly on excellent photography. Since most homebuyers start their search online, the listing pictures of a house can either make or break a possible sale. Among the several methods applied to improve real estate photography, window masking is one of the most effective post-processing tools that balances the lighting between the inside of a room and the view outside its windows, therefore improving interior pictures. While stressing the experience of PixelShouters, a top real estate photo editing company, this article investigates the nuances of window masking, its advantages, methods, and best practices. Examining the technical and artistic sides of window masking will help us to give real estate agents, photographers, and property marketers practical ideas to produce amazing, market-ready photos.
Recognizing Window Masking in Real Estate Photographs
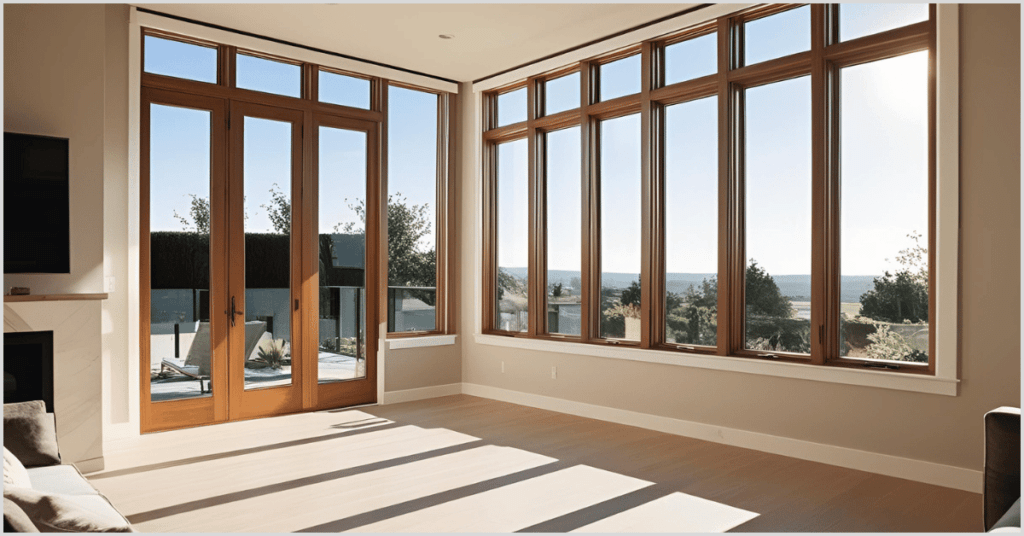
In real estate photography, window masking is a post-processing method used to combine many exposures of the same image, therefore ensuring that the view from a room’s windows is correctly exposed as well as its interior. The difficulty in photographing interiors with windows is the notable variation in lighting conditions: interiors are generally modestly illuminated relative to the strong sunlight pouring through windows. Usually, a single exposure produces either an underexposed interior (which darkens and uninvites the space) or an overexposed window (which looks as a brilliant, white vacuum). Combining a well-lit interior shot with a properly exposed window view helps window masking to create a smooth, natural-looking image that reflects how the human eye views a room.
At least two pictures are taken: one for the interior and another for the window view. These pictures are then stacked in photo editing programs like Adobe Photoshop, where the interior’s illumination is maintained while the window region is carefully masked to show the correctly exposed exterior perspective. The end effect is a balanced picture that highlights the outside surroundings and the characteristics of the room, therefore improving the attractiveness of the property.
Professional real estate picture editor PixelShouters specialises in cutting-edge methods such window masking to improve property images. Their knowledge guarantees that pictures not only appear good but also really reflect the property, thereby enabling realtors to draw more possible purchasers.
Why Masking Matters in Real Estate Photography
More than just a technical remedy, window masking is a strategic tactic improving the marketability of a property. The following are the main arguments for the need of window masking in interior real estate images:
One: Results in a Natural and Balanced Look
The human eye adapts to different light levels automatically, which lets us simultaneously perceive the inside of a room and the scene outside a window. Cameras find it difficult, meantime, to record this dynamic range in one view. By combining exposures, window masking replics this natural view and produces an image that seems reasonable and appealing. For instance, one can highlight a living room with a view of a beautiful lake or a verdant backyard without compromising the specifics of the inside design.
The second is Highlights of Property Attributes
Especially when they frame desired vistas like gardens, pools, or cityscapes, windows are typically a major selling element in real estate. Window masking guarantees that these views are clear and vivid, therefore accentuating the special qualities of the house. It also keeps glare from hiding surrounding objects like windowsills or furniture so the room shines throughout.
3. Boosts Buyer Invagement
Capturing the interest of online homebuyers depends critically on high-quality, aesthetically pleasing images. Redfin’s research shows that homes featuring professional images get 61% more web views than those featuring amateur images. Window masking improves the visual narrative of a home so that listings stand out and inspire more clicks, views, and finally questions from possible buyers.
4. improves perceived value
Real estate sales much depend on perception. Well-edited images showing the inside and outside of a home in harmony help to convey its value. Potential higher sale prices and faster transactions could result from a space seeming to be brighter, more spacious, and more luxury thanks to window masking.
7. Spares Effort and Time
Lighting conditions can make it time-consuming and perhaps impossible for photographers to capture a precisely exposed interior shot with a clean window view on-site. Window masking helps photographers to concentrate on obtaining bracketed exposures and rely on post-processing to get the intended outcome, therefore optimising the workflow. By providing expert editing and saving photographers significant time, services like PixelShouters help to streamline this process even more.
A Step-by-Step Guide on the Window Masking Process
Let’s dissect the procedure into logical, doable steps to see how window masking improves interior real estate photos. Though comparable methods can be used in other programs, this post uses Photoshop and Adobe Lightroom.
First step: record bracketized exposures
The basis of window masking is catching several views of the same scene. Here’s how to accomplish it:
-
Arrange your camera such that all views line up exactly using a tripod. To fully capture the width of the room, a wide-angle lens—say, 16–35mm—is best. To vary shutter speed, ISO, and aperture, set the camera to Manual mode.
-
To reduce noise, set a low ISO (e.g., 400) with a narrow aperture (e.g., f/8 or f/11) for a broad depth of field. Change the shutter speed to record minimum two exposures:
-
Expose for the interior of the space such that furniture, walls, and decorations are well-lit. The window could seem overdone.
-
Expose for the view outside the window; this will probably underexpose the interior.
-
-
Capture 3-5 bracketed images at various exposures (e.g., in 1 or 2 EV steps) for complicated lighting situations to offer extra data for merging.
Second step: import and pre-process in lightroom
-
Load the bracketed exposures into the Adobe Lightroom.
-
Choose the window exposure and then use the Image Adjustment tab to improve the outside view’s clarity and brightness. Change highlights, shadows, and saturation as necessary; steer clear of over-editing to preserve a natural look.
-
With an eye towards white balance and lens corrections, make consistent changes to all exposures to guarantee homogeneity.
Third Step: Open in Photoshop as Layers
-
Select photographs: In Lightroom, right-click, and pick “Edit In > “Open as Layers in Photoshop. This stacks the photographs as layers in Photoshop.
-
Sort the layers such that the window exposure—a clear view—is on top and the interior exposure—a well-lit room—is at bottom.
The fourth step is design and application of the window mask
-
Choose the top layer—window exposure—then click the “Add Layer Mask” option at the bottom of the Layers panel. To hide the window exposure layer and expose the interior exposure beneath, flip the mask (Ctrl+I or Cmd+I).
-
Choose the Brush tool, set the hardness to about 85% for sharp edges, and confirm the layer colour is white. Carefully sweep the window areas to highlight the top layer’s appropriately revealed perspective. Especially around window frames and sills, zoom in for accuracy.
-
Fix Overlaps: Change the brush colour to black and paint over any sections affected by window exposure that influences windowsills or adjacent furniture to restore the interior exposure. Alternatively, precisely choose the windows for masking with the Pen tool.
Step Five: Adjust the Blend
-
Reduce the opacity of the window exposure layer somewhat (e.g., 80–90%) to produce a smoother transition between the interior and exterior, hence enhancing the natural look of the blend.
-
Use Photoshop’s Levels or Curves adjustments to precisely control the interior and window regions’ brightness and contrast. Make sure the lighting across the picture flows together.
-
Use Photoshop’s Auto-Align Layers tool to straighten misaligned layers brought on by camera motion.
Step Six: Finish and Export
-
Once happy with the mask, flatten the layers (Layer > Flatten Image) to combine them into one single image.
-
Using Photoshop or Lightroom, apply any last changes—color correction, sharpening, or elimination of distractions.
-
Export: Save the picture in a high-resolution JPEG or PNG format fit for print marketing materials or internet listings.
Professional window masking services from PixelShouters simplify this process. By delivering perfect photographs using cutting-edge Photoshop techniques, their team of talented editors saves photographers the time and effort required by hand editing.
Novel Approaches for Window Masking
These cutting-edge approaches will help photographers wishing to go beyond window masking:
1. masking of luminosity
Creating masks based on image brightness values enables luminosity masking, therefore providing exact control over exposure mixing. Complex window views with different light levels benefit especially from this approach. As photographer Anthony Turnham points out, tools like the Lumensia panel help to ease luminosity masking in Photoshop.
In 2. Flambient Photography
Combining flash and ambient light exposures, flambient photography produces well lit interiors with clear window views. Use window masking to combine the window view from the ambient photo with the interior from the flash shot following acquisition of an ambient and a flash exposure. Often utilised by PixelShouters, this method produces professional-looking yet natural photos.
3. Integrating HDR
High Dynamic Range (HDR) photography combines several bracketed exposures to record a broad spectrum of light levels. Although HDR can be quite successful, occasionally it generates strange effects. For a more elegant appearance, window masking can be combined with HDR to gently mix particular regions, including windows. This technique can be helped by programs as Photoshop’s HDR Pro or Photomatix.
04. Twilight photography
Taken at the golden hour soon after sunset or before daybreak, twilight views improve by gentle, pleasant lighting. Twilight interiors can have window masking done to balance the cool outdoor tones with the warm interior illumination, therefore producing a comfortable and appealing environment. Editing twilight images to maximise their emotional impact is something PixelShouters shines at.
Effective Window Masking: Best Practices
Use window masking following these best methods to get professional-grade outcomes:
One could say that Plot Your Shot
-
Scout the Location: To determine your angles, first visit the property to note important window views. Think about natural light conditions and the time of day.
-
Organise furniture to maximise space and accentuate characteristics of the room. Showcasing the window view, open drapes or blinds.
-
Use a tripod to guarantee alignment between bracketed photos, therefore minimising the need for significant post-processing alignment corrections.
The second is Tune Camera Settings
-
RAW files give more freedom for post-processing colour and exposure adjustment.
-
Using Manual Mode will help you to keep constant aperture and ISO across bracketed photos, thereby altering only the shutter speed.
-
Start with a low ISO, say 400, to reduce noise—especially in shadow areas.
In 3. Masterwork Composition
-
Using a wide-angle lens can help you to capture more of the room, therefore enhancing its seeming spaciousness. Ste clear of distortion-causing ultra-wide lenses.
-
To reduce distortion in vertical lines—such as window frames—keep the camera level.
-
Frame the photo utilising the rule of thirds to accentuate important elements, such a window with an amazing view.
Four. Improve Post-Processing
-
Steer clear of over-editing to prevent artificial-looking photographs. Try for a sensible, realistic mix of inside and outside lighting.
-
Examine window frames and sills closely to guarantee perfect masking. If necessary, for exact selections use the Pen tool.
-
Apply consistent editing settings to all of the images in a listing to produce a coherent visual narrative.
Fifth. Use expert advice
Outsourcing to a firm like PixelShouters can be a revolution for photographers with limited time or editing knowledge. Delivering premium photographs that satisfy the needs of competitive real estate markets, their team specialises in window masking, HDR mixing, and other innovative techniques.
Window Masking: Problems and Solutions
Although window masking is quite useful, photographers have to negotiate several issues:
One could say that Inaccurate Layers
The challenge is that slight camera movement between bracketed shots might cause misalignment, producing ghostly or indistinct sections in the final image. Use a strong tripod and turn on Photoshop’s Auto-Align Layers capability. Use the Difference blending mode to guide exact changes in manual alignment.
The second is Unnatural Conversations
The challenge is that the image may seem altered by sharp or noticeable transitions between the inside and window sections. Change the window layer’s opacity and soften edges with feathery strokes. Change brightness and contrast to fit the lighting.
3. Complex Views of Windows
Accuracy in masking windows with complex frames, reflections, or changing lighting—e.g., partial shade—can be challenging. Solution: For exact selections, use the Pen tool; for difficult lighting situations, think about brightness masking. Test several exposures to catch all required information.
4. Time-Intensive Edit
Challenge: Especially for photographers managing several variables, window masking might take time. Lightroom presets and Photoshop actions help to simplify the workflow. Alternatively, outsource editing to PixelShouters, who can effectively manage vast amounts of photos.
PixelShouters’ Function in Window Masking
Reputable in real estate photo editing, PixelShouters provides a spectrum of services like window masking, HDR blending, colour correction, and more. For photographers and real estate agents trying to create excellent photographs without spending hours in post-processing, their knowledge is especially helpful. PixelShouters improves interior real estate views using window masking in this way:
-
Their team of expert editors guarantees natural and polished results by using cutting-edge Photoshop techniques to produce flawless window masks.
-
PixelShouters provides fast turnaround altered photographs, which lets photographers satisfy strict property listing deadlines.
-
Customised Solutions: They keep consistency throughout listings by matching their editing to the photographer’s style and the distinctive properties.
-
Cost-Effective Services: Photographers can concentrate on shooting by contracting PixelShouters, therefore benefiting from reasonably priced professional-grade edits.
-
Beyond window masking, PixelShouters provides services including virtual staging, object removal, and twilight photography editing, therefore offering a one-stop solution for real estate images.
PixelShouters can, for instance, capture a sequence of bracketed exposures and create a single, breathtaking image highlighting the interior and window view of a home in ideal harmony. Luxury homes, where every detail counts, benefit especially from this degree of knowledge.
Case Studies: Actionful Window Masking
Let us examine two fictitious case studies to show the effect of window masking:
First Case Study: Suburban Family Homework
Listing a suburban house with a roomy living area with big windows facing a lawn with a pool, a real estate agent describes Three bracketed exposures—one for the pool view, one for the inside, and a middle exposure for blending—are captured by the photographer. The editor in Photoshop mixes the well-lit interior with the vivid pool view via window masking, therefore keeping the windowsills and adjacent furnishings clear. PixelShouters’s final image emphasises the cosy atmosphere of the space and the attractiveness of the backyard, which results in a 50% rise in web views and several enquiries within days.
Second case study: urban condo with cityscape view
Floor to ceiling windows with an amazing metropolitan view abound in a luxury property in a high-rise. The photographer captures an ambient exposure and a flash exposure by means of flambient photography. PixelShouters uses window masking in post-processing to combine the well-lit inside from the flash image with the cityscape from the ambient shot. The outcome is a striking, professional photograph that highlights the modern design and amazing view of the unit, therefore supporting a rapid selling at a premium price.
These case studies show how PixelShouters’ knowledge along with window masking can turn regular interior images into effective marketing tool.
The Evolution of Window Masking for Real Estate Images
The art of window masking develops along with technology. Future directions of this method are being shaped by new trends and instruments:
-
Artificial intelligence is automating layer alignment, mask construction, and exposure merging, therefore simplifying window masking. Although they are not yet a perfect substitute for human editors, artificial intelligence techniques greatly expedite the process. By combining AI-assisted technologies with their professional editing techniques, PixelShouters keeps ahead of the curve.
-
Smartphone Photography: Window masking is becoming more easily available to amateur photographers as cellphones include sophisticated HDR features and editing apps. PixelShouters improves smartphone-captured photographs so they satisfy professional criteria.
-
Window masking will help to provide realistic, high-quality graphics for 360-degree property views as virtual tours and augmented reality experiences become more and more popular.
-
Editing sustainability is becoming more and more important, so photographers are using simplified processes and outsourcing to businesses like PixelShouters to save time and effort spent on editing.
Finally
By harmonising the illumination between the inside of a room and its window views, window masking is a transforming method that enhances interior real estate images. Window masking improves the marketability of a house by producing natural, aesthetically pleasing images, therefore engaging potential buyers and raising perceived value. In the cutthroat market of today, knowing the value of window masking is crucial whether your business is real estate agent looking for expert editing services or photographer perfecting a Photoshop approach.
This procedure revolves mostly on PixelShouters, who provides professional window masking services that save time, guarantee consistency, and produce amazing outcomes. Their dedication to excellence and creativity makes them a great collaborator for realtors and photographers trying to differentiate themselves in the real estate market. Using PixelShouters’ knowledge and including window masking into your photography process will help you produce interior photos that enthral consumers and increase sales.
See PixelShouters’ website or investigate their offerings to learn more about professional real estate photo editing and how they might improve your property listings. Your interior real estate photographs can become potent instruments for success in the digital age with the correct methods and help.
For additional resources, explore PixelShouters’ photography editing ideas, learn about filtered photography techniques, or discover why you should hire a photo editor for better images.