Balustrades are required in any house as they provide safety and style to any staircase, balconies, deck, patios. Even though professional help is preferred by most of the homeowners, a DIY balustrade is a project worth undertaking and relatively cheap to carry out, assuming you use the correct course of action. As you upgrade the outdoor deck or involve some contemporary touch in your interior staircase, this will be the guide that will take you through the necessary steps involved in planning, preparing and constructing your own balustrade safely and with ease.
1. Plan Your Project Carefully
You have got to plan before you begin to buy materials or grab tools. Start with a particular area within which the balustrade is to be placed. Measure the area. Proper measurements will make the balustrade well fitted and in accordance with the building standards.
Take into account the type of style you would like: timber, metal, glass or wire. Consider how every alternative enhances the current appearance of your house. At this point, several homeowners consider DIY balustrade kits, and they provide pre-calculated and pre-drilled units that make the task easier and save on time of installation.
Above all, get acquainted with building codes in the country. Balustrades in Australia should be of high safety standards- primarily in decks, balconies and elevated areas. This will save you money and time in the future.
2. Gather the Necessary Tools and Materials
After finalising your design, assemble the tools and materials that you will require. These can differ according to the type of balustrade though typically comprise:
- Drill and drill bits
- Level
- Measuring tape
- Saw (cutting timber or metal)
- Screws, bolts or clamps
- Rails and infill (glass panels, balusters or wires) Posts.
- Protective equipment (gloves, gorgets, boots)
Good quality materials are also used to make sure that your balustrade is robust and durable, particularly where it is used outdoors and is exposed to the weather.
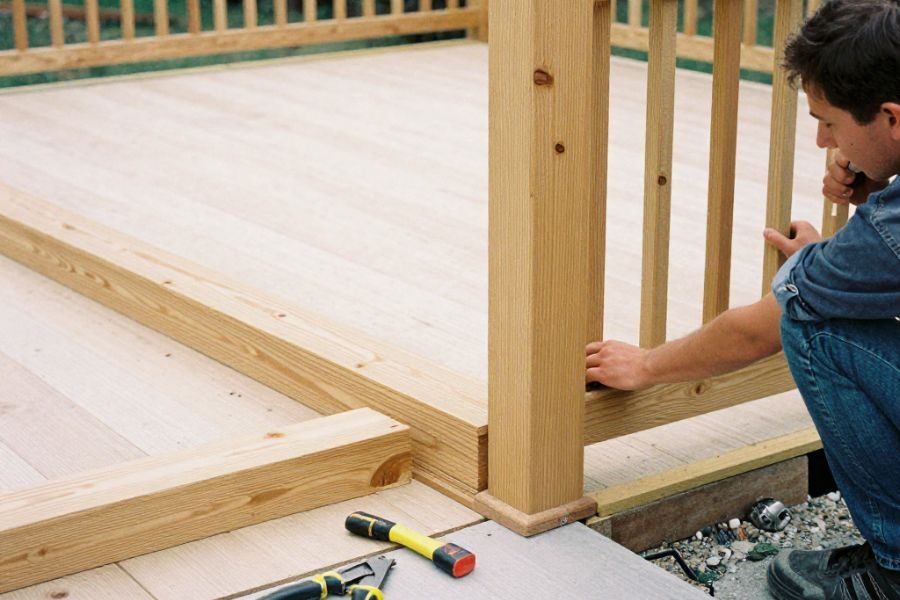
3. Mark and Install the Posts
Any balustrade system is made up of posts. Start by indicating the location of every post. Draw with pencil and level to make sure that you draw straight and evenly spaced marks. In most cases:
- The spacing of posts should be even as per the building codes.
- Extra reinforcement is needed in end posts and corner posts.
- Minimum safety standards have to be met on the post height.
Holes or attaching brackets depending on what you are fitting to- timber decking, concrete or tiled floor would need different fixings. Attach every post carefully, and keep it in check. It is important that this stage should be stable in terms of the general security of your balustrade.
4. Install the Top and Bottom Rails
After the posts have been fixed, fasten the bottom and top rails. Rails are used to give your balustrade structural stability and to give the balustrade its final appearance.
Place a level to ascertain that they are straight and then screw or bolt them together. In line with your style of choice:
- Timber balustrades can be supposed to need careful cutting and polishing.
- Metal balustrades could engage any brackets or welding.
- Glass balustrades are channel systems or clamps.
What matters is accuracy here because anything that is not precise will be revealed later and jeopardize safety.
5. Add the Infill Panels or Balusters
Once your rails are laid it is time to lay down the infill. This is either timber spindles or stainless steel wire, glass panels or metal balusters.
For timber or metal balusters:
- Space them evenly
- Make sure that gaps provided by regulations are complied with.
- Fix them firmly to the rails.
For wire balustrades:
- Install tensioners and wires based on the guide of the manufacturer.
- Ensure each wire is taut
For glass panels:
- Use clamps or channels
- Handle panels with care
- Make sure that the glass is hardened and of Australian Standards.
Be patient at this stage–and the infill will identify, to a great extent, the effect of your balustrade.
6. Sand, Seal or Paint
When timber is being used, finishing is necessary. Smooth jagged edges, use primer/stain and finish using outdoor grade sealant or paint.
7. Conduct a Final Safety Inspection
Conduct an inspection before applying your new balustrade. Check that:
- Every post is safe and there is no shake.
- Rails are properly aligned
- Infill panels or balusters are narrow.
- Screws, bolts and fixings are perfectly secured.
- Sharp edges or loose parts do not exist.
This is as well as an opportunity to consider larger-scale home safety precautions. A great number of homeowners resort to the guidelines such as 6 safety measures that every home should have, which guarantees that the balustrade does not only look good but also helps to create a general safe living environment.
Tips for First-Time DIY Builders
- Don’t hurry,–you had better have your word precise.
- There is no need to worry about consulting a professional on difficult parts.
- Work safe: gloves, eye protection and safe ladders are key requirements.
- Working at height, Fall protection must always be taken care of.
- Ensure that before you finalise your design your compliance is checked against local codes.
Final Thoughts
Self-constructing balustrade may prove to be a very fulfilling venture that improves the security and look of your house. With proper planning, tools and material you are able to build a solid, classy and durable building that will fit perfectly in your space. It should be a well-constructed balustrade whether you are designing an indoor venue of the present time or renovating an outdoor deck that would instantly increase its value and interest.